
alfred 4 초기 설정 – 맥 필수 앱
alfred 4 초기 설정 부분입니다.
파워팩으로 구매합니다.
그래야 다양한 워크플로우와, 클립보드와 snippet 사용, terminal commands, themes설정, 싱크 기능이 가능합니다.
꼬옥 필요한 기능이니 꼬옥 구매하세요!
alfred는 필수 앱중에 하나입니다.
메뉴바에서 알프레드 설정을 클릭합니다.

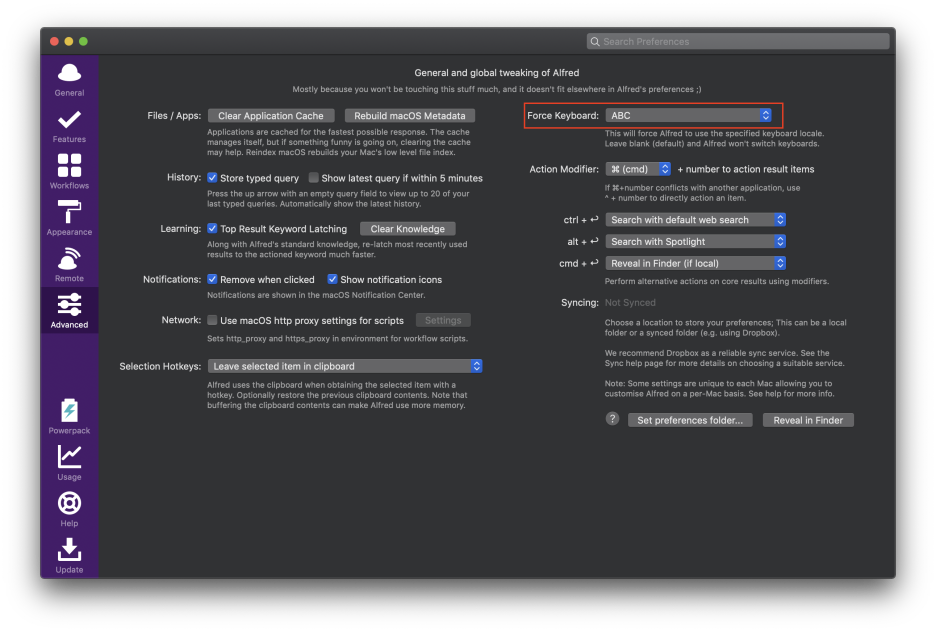
빨간색 부분을 알파벳으로 바꿔서 처음 타이핑은 무조건 영문으로 세팅해주셔야 합니다.
그래야 키보드 한글로 되었을시 키워드 부를때 영문으로 바꾸는 번거로움을 덜어줍니다.
Features 각 항목들 설정
File Search
바꿔주실 필요 없이 기본 설정으로 해놓습니다.

많이 쓰는 기능중에 하나입니다.
알프레드를 불러온 후
[ 파일명 을 치면
검색과 함께 파일을 실행해줍니다.

클립보드

단축키는
⌥(oprion) + ⌘(command) + C 키입니다.
전 ⌥(oprion) + C 키로 바꿔서 사용합니다.
키워드는
cb 입니다.
단축키나 키워드로 실행된 모습입니다.
클립보드에서 선택한 다음 붙여 넣기하면 됩니다.

Web search
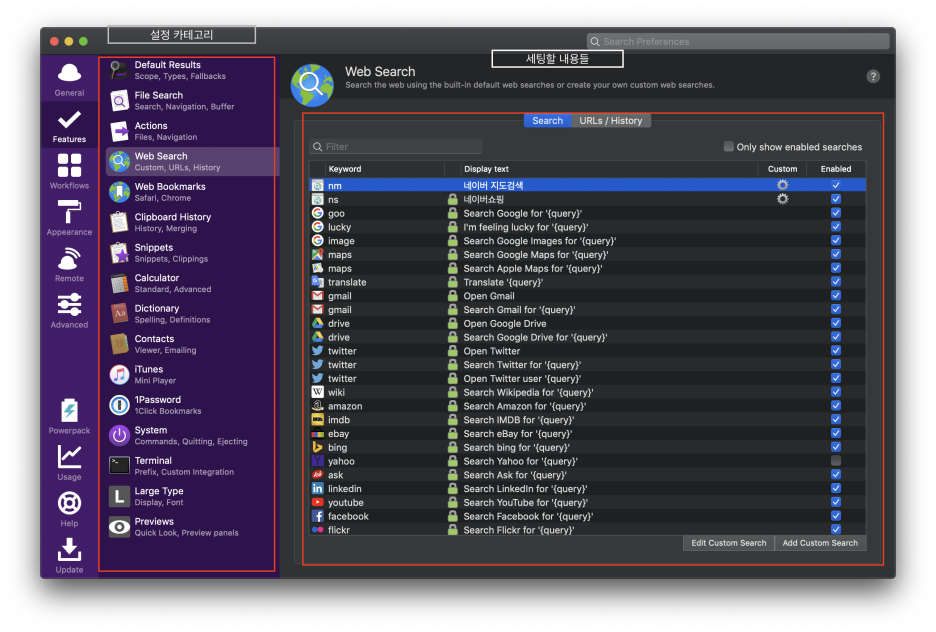
웹서치 설정입니다.
각종 포탈사이트 와 쇼핑몰 등에서 검색창에 검색을 하고 주소창에 나와있는 주소의 검색어 문구를 {query}로 대체한다고 생각하시면 됩니다.
예를 들어
네이버 쇼핑에 떡볶이로 검색하면
주소창에는
https://search.shopping.naver.com/search/all.nhn?query=떡볶이&cat_id=&frm=NVSHAKW
라고 표시됩니다.
빨간색 부분을 {query}로 대체합니다.
https://search.shopping.naver.com/search/all.nhn?query={query}&cat_id=&frm=NVSHAKW
이러한 방식으로 웹서치에 Add custom search 클릭 후
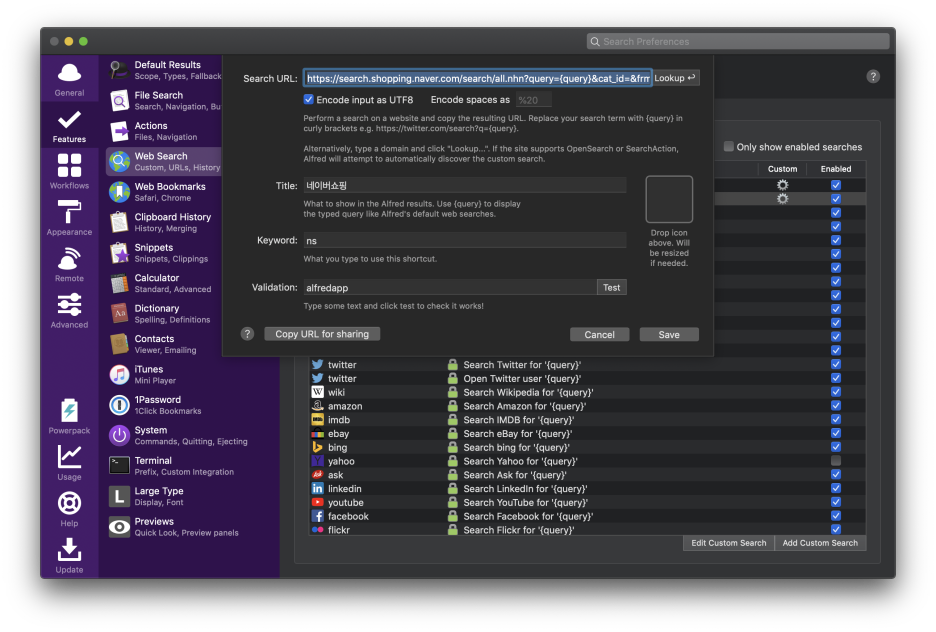
서치 url 위에 내용 적은후
타이틀은 원하는대로 적고 난후 키워드는 알아서 적으시고 적용하면
네이버 쇼핑이 검색 됩니다.
네이버 지도는
http://map.naver.com/?query={query}
네이버 영화는
https://movie.naver.com/movie/search/result.nhn?query={query}§ion=all&ie=utf8
이걸 집어 넣어주면 됩니다.
이런식으로 자신이 자주 검색하는(사전, 쇼핑몰) 등을 등록해서 사용하면 됩니다.
너무 많이 등록 해봤자 사용하는 것만 사용하니 저는
아마존, 쇼핑, 지도, 영화만 등록해 놨습니다.
넷플릭스 – https://www.netflix.com/search?q={query}
TMDB – https://www.themoviedb.org/search?language=ko&query={query}
Web Bookmarks

자신이 사용하는 브라우저를 선택 해줍니다.
키워드는 bm 입니다.
alfred 호출 후 bm 북마크 검색 후
쉬프트키 누르면 프리뷰기능도 있습니다.

Snippets

환경설정에 비슷한 기능으로 키보드 – 텍스트 – 대치항목이란 항목이 있습니다. 그런데 어디서든지 다 잘 작동되는 부분이 아니라
알프레드의 snippets 기능으로 대체합니다.

키워드를 치면 자동적으로 snippet 완성어가 대체됩니다.
예를 들면

위와 같이 설정했다면

이런식으로 단축어가 대체됩니다.
주로 터미널 명령어 등록해서 많이 사용합니다.
sudo systemctl restart [email protected]. – 이런 길게 써야하는 명령어들!
그리고 참고로 snippet 기능으로 유명한거는 textexpander 라는 프로그램이 있습니다.
스니펫 기능과 함께 애플스크립트도 지원해서 사용하기에는 이게 좋긴한데 월 비용이 나갑니다. ㅜ,.ㅜ

Dictionary

사전 찾기 입니다. 맥의 기본 사전에 찾기를 실행해줍니다.
네이버 사전 워크플로우가 있어 사용하지는 않습니다.

System

맥을 끌때나 잠자기 또는 모든 프로그램 종료 할때 사용합니다.
특히 끄기 전
Quit All App
또는 잠자기
sleep
terminal – iTerm2로 대체 (iterm 사용 안하시는 분은 넘겨주세요)
https://github.com/vitorgalvao/custom-alfred-iterm-scripts
-- Set this property to true to always open in a new window
property open_in_new_window : false

-- Handlers
on new_window()
	tell application "iTerm" to create window with default profile
end new_window

on new_tab()
	tell application "iTerm" to tell the first window to create tab with default profile
end new_tab

on call_forward()
	tell application "iTerm" to activate
end call_forward

on is_running()
	application "iTerm" is running
end is_running

on has_windows()
	if not is_running() then return false
	if windows of application "iTerm" is {} then return false
	true
end has_windows

on send_text(custom_text)
	tell application "iTerm" to tell the first window to tell current session to write text custom_text
end send_text

-- Main
on alfred_script(query)
	if has_windows() then
		if open_in_new_window then
			new_window()
		else
			new_tab()
		end if
	else
		-- If iTerm is not running and we tell it to create a new window, we get two
		-- One from opening the application, and the other from the command
		if is_running() then
			new_window()
		else
			call_forward()
		end if
	end if

	-- Make sure a window exists before we continue, or the write may fail
	repeat until has_windows()
		delay 0.01
	end repeat

	send_text(query)
	call_forward()
end alfred_script
터미널 항목에서 어플리케이션을 커스텀으로 바꿔준 후 위에 스크립트를 붙여 넣기하면
알프레드로 터미널 명령어 칠 때 iTerm2로 실행됩니다.

여기까지만 설정 해 주셔도 사용하기가 좀 더 편리해질 것입니다.
이상
alfred 4 초기 설정 을 다루었습니다. 다음에는 유용한 워크플로우 들을 소개 해 드리겠습니다.


