소개
100개가 넘는 서비스와 여러 언어로의 번역을 통합한 현대적이고 완전히 정적이고 빠르고 안전하며 완전히 프록시 되어 고도로 사용자 정의 가능한 애플리케이션 대시보드입니다. YAML 파일이나 Docker 레이블 검색을 통해 쉽게 구성할 수 있습니다.
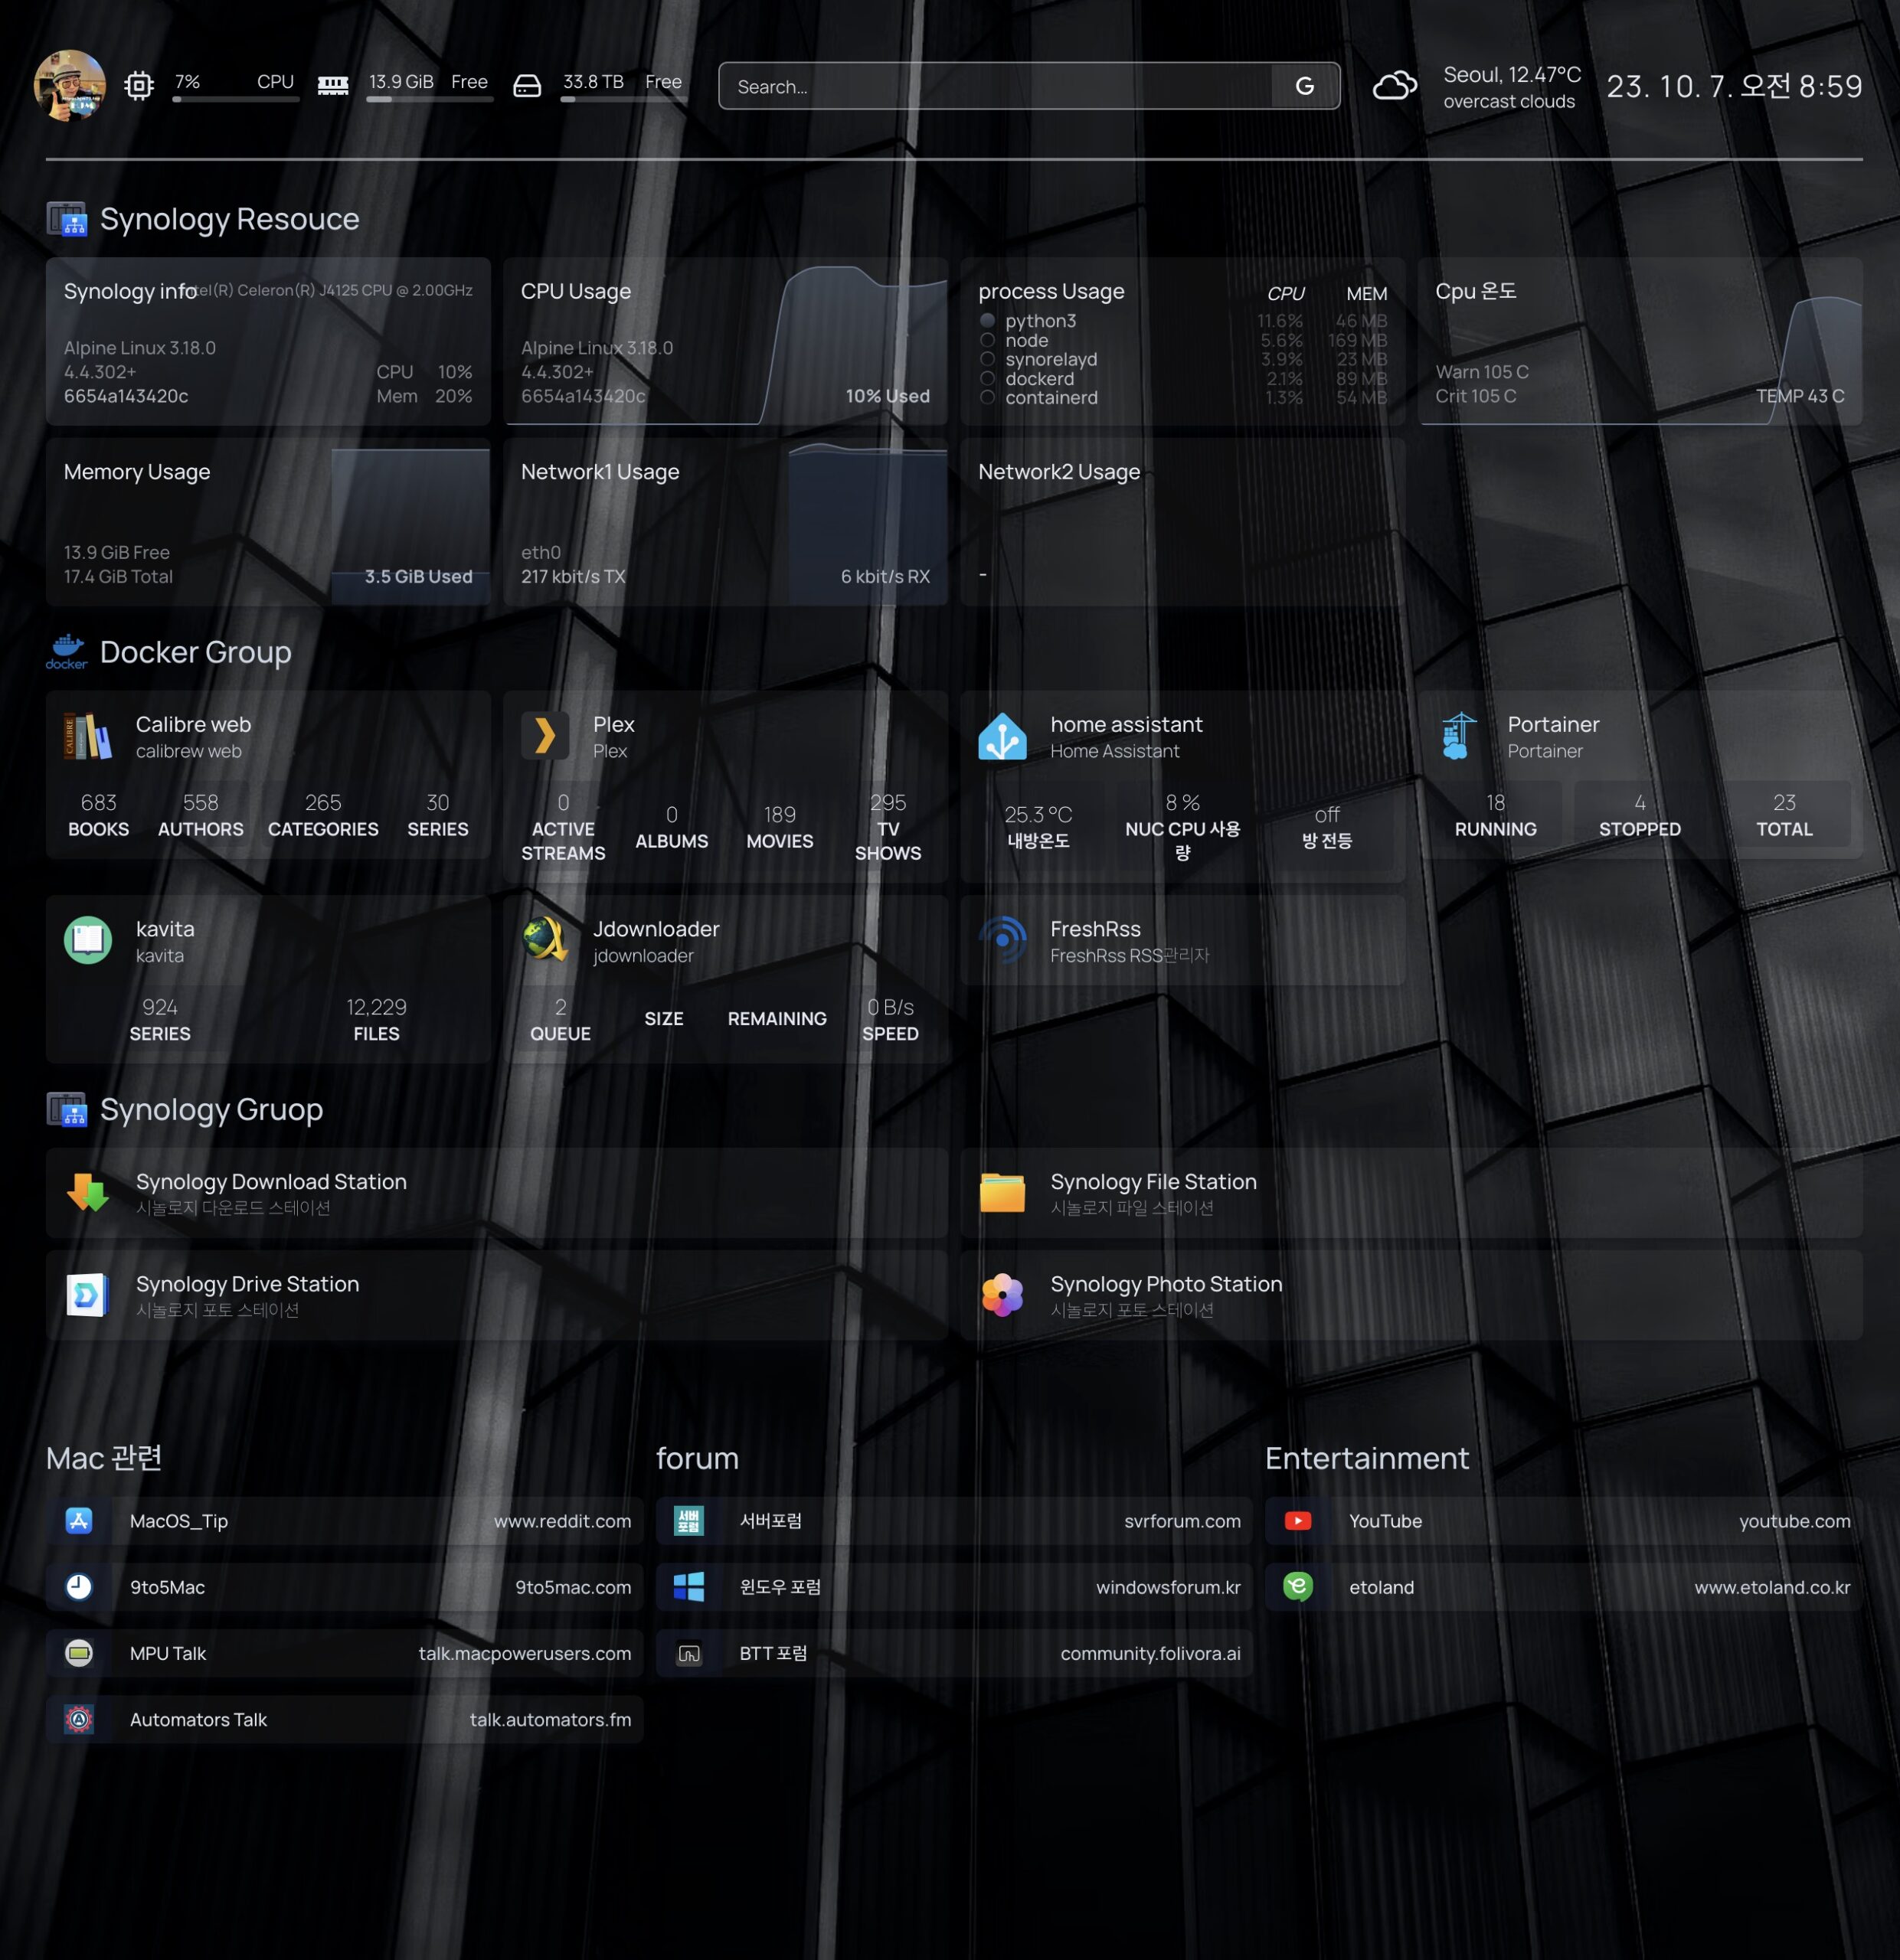
organizr 같이 사용하고 있는 gethomepage 입니다
organizr과 같이 사용하면 좋습니다.
설치방법
시놀로지 컨테이너 매니져로 손쉽게 docker compose로 설치 가능합니다.
docker compose를 통한 설치
파일 스테이션에서 폴더를 생성합니다.
docker – organizr폴더를 생성한 후 gethomepage 폴더에 또 하위 폴더 /config 폴더를 생성합니다.
그리고 이미지 폴더를 사용하시려면 image 폴더도 생성해줍니다.
(우분투에서는 docker의 루트권한을 주면 자동적으로 폴더가 생성되는데 시놀로지는 권한을 주었는데도 안되네요 아시는분 댓글좀)
그러면 아래와 같은 형식으로 폴더가 생성되겠습니다.
/volume1/docker/gethomepage/config
/volume1/docker/gethomepage/image

컨테이너 매니져를 실행하고 프로젝트 생성을 클릭 후 아래와 같은 순서대로 진행합니다.

3번 항목에 아래와 같이 복사 붙여 넣기 해줍니다.
version: "3.3"
services:
  homepage:
    image: ghcr.io/gethomepage/homepage:latest
    container_name: homepage
    ports:
      - 3000:3000 #앞에 3000를 원하는 포트로 넣어주세요
    volumes:
      - ./config:/app/config # Make sure your local config directory exists
      - ./image:/app/public/icons  #이미지 폴더를 사용하실거면 docker/image 폴더를 생성 후 사용하시기 바랍니다.
      - /var/run/docker.sock:/var/run/docker.sock:ro # (optional) For docker integrations
    # user: 1000:1000 optional, not compatibile with direct socket see https://gethomepage.dev/en/configs/docker/#using-socket-directly
    restart: unless-stopped
그리고 다음을 입력하시고
http://나스IP:지정한포트(위에 3000) 를 입력하시면 홈페이지로 이동합니다.
gethomepage 설정
홈페이지에 자세한 설명이 나와 있으니 읽어보시고 참고바랍니다.
https://gethomepage.dev/en/configs/services/
패키지센터에서 텍스트편집기를 설치합니다.

파인스테이션 – docker – gethomepage – config 폴더로 이동합니다.

bookmark, services, widgets, settings 이 네가지 파일을 손보면 되겠습니다.

서비스항목, 북마크 설정 (services.yaml & bookmark.yaml)
서비스 항목입니다. 파일명 services.yaml 을 텍스트 편집기로 수정하시면 되겠습니다.
아래 홈페이지 참조 바랍니다. 여러 위젯 부분이 있으니 보시는게 좋을 듯 하네요
https://gethomepage.dev/en/configs/services/
아래는 제가 사용한 항목 사이트와 아이피 삭제하고 예제로 올려봤습니다.
그리고 저장시에는 UTF-8 형식으로 저장해야 한글이 제대로 표시됩니다.
아이콘은 대시보드 아이콘과 material design icon 을 지원합니다. 아래 사이트 프로그램 검색 후
https://github.com/walkxcode/dashboard-icons/tree/main/png
ex) plex 검색 후 파일명 확인 후 plex.png 집어넣어 주시면 아이콘 표시됩니다.
또는 특정 url 주소 집어넣으셔도 아이콘 표시되고
이미지 폴더 생성후 도커에 폴더 링크해주시고 /images/파일명 집어넣으셔도 아이콘 표시됩니다.
---
# For configuration options and examples, please see:
# https://gethomepage.dev/en/configs/services

- Synology Resouce:
    - Synology info:
       widget:
          type: glances     #glances 설치 참고
          url: http://localhost:61208/
          metric: info

    - CPU Usage:
       widget:
          type: glances
          url: http://localhost:61208/
          description: cpu 사용량
          metric: cpu
    - process Usage:
       widget:
          type: glances
          url: http://localhost:61208
          metric: process
    - Cpu 온도:
       widget:
          type: glances
          url: http://localhost:61208
          metric: sensor:Physical id 0
    - Memory Usage:
       widget:
          type: glances
          url: http://localhost:61208
          metric: memory
    - Network1 Usage:
       widget:
          type: glances
          url: http://localhost:61208
          metric: network:eth0    #네트워크명 입력
    - Network2 Usage:
       widget:
          type: glances
          url: http://localhost:61208
          metric: network:eth1    #네트워크명 입력


- Synology Gruop:
    - Synology Download Station:
        icon: /icons/DownloadStation.png
        href: https://test.test/down
        description: 시놀로지 다운로드 스테이션
    - Synology File Station:
        icon: /icons/FileStation.png
        href: https://test.test/file
        description: 시놀로지 파일 스테이션
    - Synology Drive Station:
        icon: /icons/Drive.png
        href: https://test.test/drive
        description: 시놀로지 포토 스테이션
    - Synology Photo Station:
        icon: /icons/photos.png
        href: https://test.test/photo
        description: 시놀로지 포토 스테이션


- Docker Group:
    - Calibre web:
        icon: calibre.png
        href: https://test.test/calibre
        description: calibrew web
        widget:             # 옵셥인 위젯항목
            type: calibreweb
            url: https://test.test/calibre
            username: user
            password: pass

    - Plex:
       icon: plex.png
       href: https://test.test/web
       description: Plex
       widget:      # 옵셥인 위젯항목
            type: plex
            url: https://test.test
            key: NXb6gxNU_xExaYn

    - home assistant:
       icon: home-assistant.png
       href: https://ha.test.test/
       description: Home Assistant
       widget:     # 옵셥인 위젯항목
           type: homeassistant
           url: https://test.test
           key: eyJhbGciOiJIUzI1NiIsInR5cCI6IkpXVCJ9.eyJpc3MiOiJoyMDEwMTkwNjMwfQ.Yi63-lP-UH8DF
           custom:
             - state: sensor.zhi_neng_yao_kong_temperature
               label: 내방온도
             - state: sensor.processor_use
               label: Nuc cpu 사용량
             - state: light.yeelight_ceilc_0x182d1cc9
               label: 방 전등

    - Portainer:
       icon: portainer.png
       href: https://test.test/portainer
       description: Portainer
       widget:
           type: portainer
           url: https://test.test
           env: 2
           key: ptr_CGS9W+lF8hznW7DtK6qx7dfF2oANUlPA

    - kavita:
        icon: kavita.png
        href: http://localhost:5011
        description: kavita
        widget:
            type: kavita
            url: http://localhost:5011
            username: user
            password: pass
    - FreshRss:
        icon: freshrss.png
        href: https://test.test
        description: FreshRss RSS관리자
        #widget:
        #   type: freshrss
        #   url: https://rss.test.test
        #   username:
        #   password:
glances 설치하시면 모니터링 위젯도 생성 할 수가 있습니다.
마찬가지로 bookmark.yml 항목도 원하시는대로 수정해면 됩니다.
위젯항목 (widgets.yaml)
상단 위젯 부분 수정하는 방법입니다.

config 폴더의 widgets.yaml 항목을 텍스트 에디터로 수정하시면 됩니다.
# For configuration options and examples, please see:
# https://gethomepage.dev/en/configs/widgets
- logo:
    icon: /icons/hjm79.png

- resources:
    cpu: true
    memory: true
    disk: /

- search:
    provider: google
    target: _blank

- openweathermap:
    label: Seoul # 보여줄 항목임
    latitude: 37.642822059067356    #표시할 경도와 위도
    longitude: 127.04090905169616   #표시할 경도와 위도
    units: metric
    provider: openweathermap
    apiKey: 381fxxxxxxxxxxxxxxxxx # openweathermap api 키 입력 바람
    cache: 120 # Time in minutes to cache API responses, to stay within limits

- datetime:
    text_size: xl
    locale: ko
    format:
      timeStyle: short
      dateStyle: short
setting.yaml
https://gethomepage.dev/en/configs/settings/
설정항목입니다.
# For configuration options and examples, please see:
# https://gethomepage.dev/en/configs/settings

providers:
  openweathermap: openweathermapapikey
  weatherapi: weatherapiapikey

quicklaunch:
    searchDescriptions: true
    hideInternetSearch: true
    hideVisitURL: true

layout:
  Synology Resouce:
    icon: /icons/CMS.png   #이미지 폴더에 원하는 이미지 넣어주시고 파일명 넣어주시면 표시됩니다.
    style: row
    columns: 4               #한줄에 표시할 카드 수
  Docker Group:
    icon: /icons/docker.png
    style: row
    columns: 4
  Synology Gruop:
    icon: /icons/CMS.png
    style: row
    columns: 2

#배경이미지로 사용 가능합니다. 아래 주소 테스트로 사용하셔도 좋습니다.
background:
  image: https://images.unsplash.com/photo-1526289034009-0240ddb68ce3?ixlib=rb-4.0.3&ixid=M3wxMjA3fDB8MHxwaG90by1wYWdlfHx8fGVufDB8fHx8fA%3D%3D&auto=format&fit=crop&w=2671&q=80
  #blur: sm
  #opacity: 80
이상 대시보드로 사용하는 gethomepage 였습니다. 설치는 어렵지 않지만 설정하는 부분이 많이 귀찮습니다.
그래도 한번 설정하고 나면 뿌듯하니 천천히 설정해보시기 바랍니다.


